


|
|

About cases
Cases are the 'units of observation' in your research study. They might represent people, places, events, organizations or other entities that you want to analyze and compare. This topic helps you to understand and work with cases.
Cases are a type of node. The terms "case" and "case node" are used interchangeably.
For an overview of cases, you can watch the video tutorial Understand nodes and cases.
For more information about working with cases, you can watch the video tutorial Organize your demographic data.
In this topic
- What are cases?
- Why create cases?
- Working with a small number of cases
- Working with a large number of cases
- Organizing case nodes into folders
- Creating case node hierarchies
- Aggregating case nodes (gather all content in the parent case node)
- Explore the references in a case node
- Explore cases using visualizations
- Explore cases using queries
What are cases?
In NVivo, cases are nodes that represent 'units of observation'—for example, the people you interviewed or the communities you studied. Your project might have case nodes for people, places, organizations, events or other entities.
Cases differ from other nodes because they can have attributes (variables) such as age, gender or location. Using queries, you can compare cases based on these attributes.
Setting up a case involves:
-
Creating a case node
-
Classifying the case node and assigning attributes
-
Coding relevant content at the case node
For example—you might make a case node for a participant called Barbara, assign attributes for age, gender and education, and then code all Barbara's content at the node:
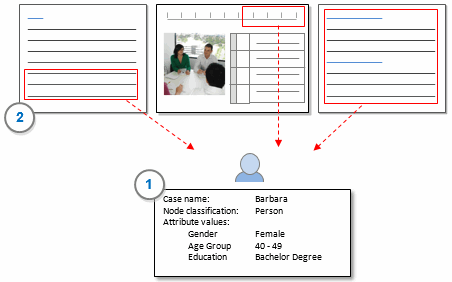
1 Make a case node for Barbara with the classification Person and assign attribute values for age, gender and education level.
2 Code all content relating to Barbara at the Barbara case node.
When you begin a project, it is a good idea to decide on your units of observation and plan for the case nodes you will need to represent them.

Why create cases?
Creating your units of observation as case nodes allows you to:
-
Group multiple sources that relate to the same entity—for example, code an interview transcript, survey responses and follow-up correspondence to the same person.
-
Record the same source against multiple participants—for example, code a focus group transcript to each of the speakers.
-
Record and query demographic information—for example, use a matrix coding query to compare your respondent's comments based on their attitudes.
Just like theme nodes, you need to code your sources at the case node to be able to query the data.
Working with a small number of cases
If you are working with a small number of cases, you may want to setup your case nodes one at a time. For example, imagine that you want to make cases for the high school students you interviewed. You can do this manually as follows:
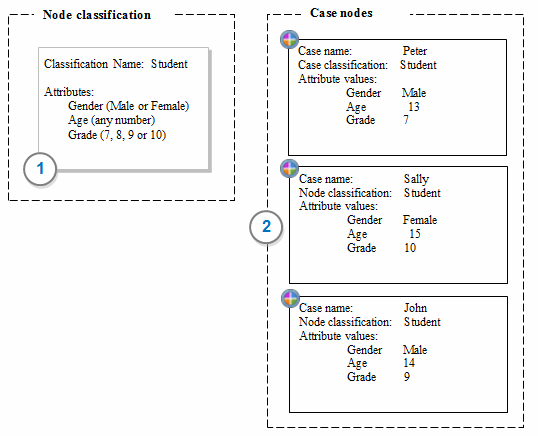
1 Create a new case classification called Student and add the attributes gender, age and grade to the classification.
2 Create a case to represent each student (for example, Peter, Sally and John), and then set the classification of each case node to Student and then set the attribute values.
Once your cases are created, you can code the responses of the different students to the case node that represents them, and you can use queries to compare the responses by age or gender or grade.
Working with a large number of cases
If you have a lot of cases, then NVivo provides ways to speed the process up.
| What form is your data in? | Suggested approach |
| I have a text file
that contains a list of cases and their attribute values.
|
Import the text file as a classification sheet containing demographic information about the participants. The cases are created when you import the classification sheet (if they do not already exist). |
|
I have a dataset of survey responses including demographic information about respondents. |
Use the Auto Code Assistant to create, classify and code at case nodes representing each of the respondents. Refer to Automatic coding in dataset sources for more information. |
|
A dataset containing social media data. |
Use the Auto Code Wizard to code and classify. For example, when you use the Auto Code Wizard to code to Username, cases for users are created and automatically classified—such as 'Facebook User' or 'Twitter User'. |
| I have created case nodes in my
project but they are not classified yet.
|
Select a number of cases in List
View and assign a classification.
For example, select all the cases representing people you interviewed and classify them as Student. You can open the classification sheet for the classification Student and set the attribute values for each student. |
You can classify cases at any stage of your project but you may want to consider the following:
-
When you are collecting data make sure you record the descriptive information that supports the questions you want to ask. For example, if you want to compare attitudes based on location make sure you collect this information. You can store it directly in NVivo or in a separate file (text file or spreadsheet) and import it later.
-
You need to classify cases and code source content at the cases before you can use queries to ask comparative questions—such as how are large organizations adapting to climate change? How do they differ from smaller organizations?
For more information refer to Classify cases (set attribute values to record information).
Organizing case nodes into folders
Just like sources, you can organize cases in folders to suit the way you work:
-
Cases
-
Survey Respondents
-
Interview Participants
You can use folders to set the scope of a query—for example, run a Text Search query on all the material in the Interview Participants folder.
Creating case node hierarchies
You can organize cases in hierarchies (parents and children) to organize your material and consolidate your thinking.
For example, you might want to organize case nodes based on the type of participants you are working with:
-
Respondents
-
farmers
-
Giacomo
-
Ari
-
fisheries
-
Franz
-
Vikram
If there is no logical connection between your cases (or perhaps these connections are not yet apparent) you can just add cases at the top level of the hierarchy.
Keeping your case nodes organized can help you to see connections, clarify your thinking and code efficiently—for more ideas about creating a manageable node structure, refer to Code sources and manage nodes (Build an efficient node hierarchy).
NOTE Organizing your cases into hierarchies won't automatically include content coded at the child case node in the parent case node. To do this, you need to turn on aggregation.
Aggregating case nodes (gather all content in the parent case node)
When working with cases in a hierarchy, you can gather all the content from child case nodes and roll it up to the parent case node. Aggregation is turned off by default.
For example, you could turn on aggregation for the case Classroom A and gather all the content coded at the child case nodes—this can be useful if you want an overall perspective:
-
Classroom A
-
Brian
-
Conor
-
Frank
-
Lisa
All current coding at Lisa and any future coding or uncoding at Lisa will be reflected in Classroom A. The number of sources and references for the Classroom A case will reflect an aggregated total of the number of sources and references from all of its child case nodes.
When aggregation is turned off on a parent case node, the hierarchical structure is a visual representation only.
When you open a case that has aggregation turned on, you can see all content coded at the case and content coded at the direct child case nodes.
For more information, refer to Aggregate nodes (gather all content in a parent node).
NOTE: Aggregation does not include case attribute values. For example, when you run a query on a parent case node, the attribute values of its child case nodes are not included in the query.
Explore the references in a case node
You can open a case node to see all the references that have been coded at the case—for example, you can explore everything a particular participant said or all the material you have gathered about an organization.
You can turn on coding stripes to see the themes that have been coded at the case and 'code on' to other themes or topics. As you read through the references, you might want to record your observations and ideas in a linked memo.
To understand more about working with the content in a case node, refer to Review the references in a node.
Explore cases using visualizations
You can explore your cases with visualizations.
-
Hierarchy charts enable you to view the attribute values of cases and sources. You could create a hierarchy chart to explore the demographic spread of your respondents—for example, you may want to check the representation of male and female respondents. You could also use a hierarchy chart to compare attribute value combinations amongst your cases. Refer to About hierarchy charts for more information.
-
Explore diagrams focus on a single project item—for example, a particular case—and show all of the items connected to that item. The diagram is dynamic, allowing you to step forward and back through your project data to explore the connections between items. Refer to About explore diagrams for more information.
Explore cases using queries
When you have created cases, coded content and assigned attributes, you can use these attributes to gather the data or make comparisons.
For example, you could:
-
Use a Coding query to gather what participants over forty said about water quality.
-
Use a Matrix coding query to compare what men and women said about the natural environment.
-
Run a Coding query to gather all the material by female participants and create a new node based on the results. Then run a Word Frequency query on this new node to check for commonly used terms. Do the same for the male participants and compare your findings.