


|
|

Coding techniques
NVivo provides a number of ways to code your sources. You can define your node structure first and then code at the existing nodes or you can create and code at nodes as you work through your source material.
What do you want to do?
- Code with the coding panel
- Drag and drop coding
- Code with the shortcut menu
- Code at an existing node (using the ribbon)
- Code at a new node (using the ribbon)
- Code entire sources to a node
- Make a node from selected text (In Vivo code)
Code with the coding panel
The coding panel provides a quick way to code to existing, new or recently used nodes.
Use the coding panel to quickly code to existing, new or recently used nodes.
- Open a source or node in Detail View.
- Select the content that you want to code.
- Click Code at the top of Detail View.
Keyboard Shortcut Press ⌘ + /.
-
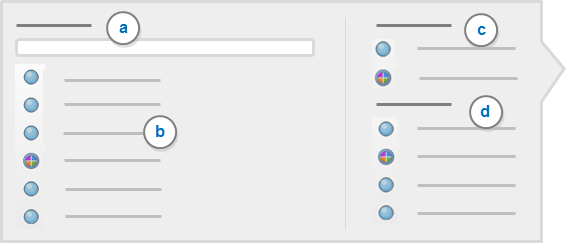
In the coding panel, do one of the following depending on whether the node or case you want to code to already exists, is new or was recently used.
-
Existing Node In the search box (a), type all or part of the node or case name. In the filtered results (b), click the node or case you want to code to.
-
Code at New In the search box (a), type the name of the node or case you want to create. Under Code at New (c), click the relevant node or case.
-
Recent Under Recent (d), click the relevant node or case.
NOTE
-
To code to more than one node or case in the list, press SHIFT as you select the nodes or cases.
-
You can use keyboard shortcuts in the coding panel—for example, use the arrow keys to navigate or press ENTER to confirm a selection.
-
To indicate that coding is successful, a confirmation message is briefly displayed in Navigation View.

Drag and drop coding
You can drag and drop to code selected content at an existing node:
-
Display your nodes in List View.
-
Open a source or node in Detail View. You may want to arrange the work area so that Detail View is beside the node list—refer to Customize the work area (Display Detail View on the right) for more information.
-
Select the content you want to code.
-
Drag the selected content to the node.
NOTE To indicate that coding is successful, a confirmation message is briefly displayed in Navigation View.
Code with the shortcut menu
Use the shortcut menu to quickly code content.
- Open a source or node in Detail View.
- Select the content you want to code.
- Control-click to display the shortcut menu and choose one of the coding options:
- Code Selection at existing, new or current nodes.
- Code In Vivo to make a node from the selected text.
NOTE To indicate that coding is successful, a confirmation message is briefly displayed in Navigation View.
Code at an existing node (using the ribbon)
-
Select the content you want to code.
-
On the Analyze tab, in the Coding group, under Code Selection At, click Existing Nodes.

- On the left, click the folder name that contains the node you want to code at.
- On the right, select the check box for the node you want to code at.
-
Click Select.
NOTE
-
You can code the selected content at multiple nodes.
-
To indicate that coding is successful, a confirmation message is briefly displayed in Navigation View.
Code at a new node (using the ribbon)
-
Select the content you want to code.
-
On the Analyze tab, in the Coding group, under Code Selection At, click New Node.
-
(Optional) Change the location for the new node—for example, if you want to store the new node in a specific nodes folder or underneath another node in a hierarchy. To change the location, click the Location disclosure triangle and choose a new location.
-
Enter a name and description for the new node.
-
Click Done.
NOTE
-
If you want to code to a new case, then on the Analyze tab, in the Coding group, under Code Selection At—hold down New Node and then click New Case.
Code entire sources to a node
You can code entire sources to new or existing nodes. This can be useful, if you want to code everything in the source to a particular theme node, or if the source contains the responses of an individual and you want to code it all at their case node.
When you code entire sources, the number of coding references created vary depending on source type—for documents, the entire content is coded to a single reference, whereas for audio sources, the media and transcript are coded to separate references—refer to About coding (Coding entire sources to a node) for more information.
To code entire at a new node:
-
Select the source (or multiple sources) in List View, or click in the source that is open in Detail View.
-
On the Analyze tab, in the Coding group, under Code Sources At, click New Node.
-
(Optional) Change the location for the new node—for example, if you want to store the new node in a specific nodes folder or underneath another node in a hierarchy. To change the location, click the Location disclosure triangle and choose a new location.
-
Enter a name and description for the new node.
-
Click Done.
To code entire at an existing node:
-
Select the source (or multiple sources) in List View, or click in the source that is open in Detail View.
-
On the Analyze tab, in the Coding group, under Code Sources At, click Existing Nodes.
- On the left, click the folder name that contains the node you want to code at.
- On the right, select the check box for the node you want to code at.
- Click Done.
NOTE
-
You can code the selected sources at multiple nodes.
Make a node from selected text (In Vivo code)
You can create a new node based on selected text—this is called 'In Vivo' coding. The text is used as the node name (up to 256 characters).
To create a node In Vivo:
-
Select the text content you want to code.
-
On the Analyze tab, in the Coding group, click Code In Vivo.
A node is created based on the selected text.
NOTE
-
You can edit the node name in the Node Properties—select the node in List View, then on the Home tab, in the Item group, click Get Info.